Installation instructions for Weber adapter for HYENA HRN motor

! WARNING !
Before you fit our adapter, you must determine whether your bike is approved for trailer use. Check the operating instructions for your bike, ask the manufacturer or ask a bike dealer.
The towing bike must be approved for trailer operation. Riding the trailer with a towing bike that has not been approved by the manufacturer can lead to frame breakage or other material problems. This can result in accidents with life-threatening injuries.
If you are not sure how to install our adapter correctly, please contact a specialist workshop.
Our adapter must be fitted correctly. An incorrectly fitted adapter can come loose while riding and lead to accidents with life-threatening injuries.
You should definitely bear this in mind:
- Our adapters are only approved for bicycles and pedelecs (max. 25 km/h), not for S-pedelecs or e-bikes from 25 km/h!
- We would like to point out to all dealers and end users that they themselves are responsible for the entire bicycle trailer system and its correct functioning in terms of product liability!
- It is your responsibility to determine the correct thread size of your rear hub on your bike. Do not attempt to fit our adapter with a different thread size to your rear hub. An incorrect thread size can damage your bike. If you are unsure of the correct thread size, please contact us by email or phone and we will be happy to help you.
- cannot be used with bikes made of carbon or with carbon dropouts and carbon rear triangle!
- Regularly check the correct torque setting and that all components are free of play before using your bike in trailer mode!
- If you do not have a calibrated torque wrench for fitting our adapter, contact a specialist workshop.
FOR ASSEMBLY
IMPORTANT: Always mount the trailer on the left-hand side in the direction of travel!


After removing your current M6 x 14cylinder screw (on the left in FR) from your rear triangle (frame), you can now install our threaded bolt there.
To do this, you will need a torque wrench with an Allen key attachment ( 6 mm wrench size); the specified tightening torque is 10-12 Nm.
Then slide the sleeve over the threaded bolt, followed by the enclosed Nord Lock wedge lock washer (Di ø13.0mm).


Now screw the Weber adapter onto the threaded bolt, but first remove the screw and the wedge lock washer on the adapter.


You will need a17 mm open-end wrench to tighten the adapter.
The tightening torque for this must NOT be higher than that of the threaded bolt; we recommend a maximum of 12 Nm. You can insert a 6 mm hexagon socket wrench through the adapter to lock the threaded bolt in place.
Then you can attach your Weber coupling, first you place the folded plate of your Weber coupling on the polygon attachment (12-edge) of the adapter.
The bending edge of the plate should ideally be vertical when installed. Now place the wedge lock washer concentrically on the cylindrical base of the adapter, followed by the M8 x 12 mm screw .
To tighten the clutch properly (the engagement of the teeth of the wedge lock washers must be ensured), we recommend using a ring wrench SW13mm or, even better, a ratchet with a 13mm socket.
When tightening the screw(M8 x 12), make sure that the tightening torque is not transferred to the already tightened threaded bolt and adapter.
To do this, you can also secure the adapter using a 17 mm open-end wrench (counter-lock).
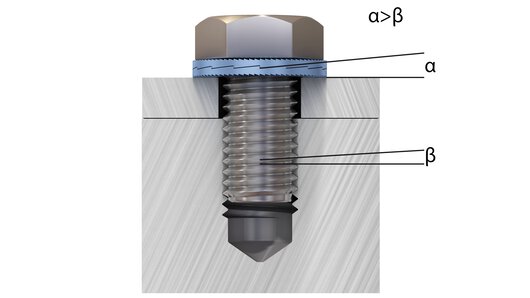
The be-all and end-all of our clutch connection is the wedge lock washer from Nord-Lock, here you can see how it works.